The views expressed on this blog are my own and do not necessarily reflect the views of Oracle.

Sunday 25 September 2016

Application class to control ­­­Side (Left) Panel in 8.55

With the release 8.55 People Tools has introduced new page types namely Side Page 1 and Side Page 2. These pages are a good replacement technique to the old method of having a complex two panel layout. With the introduction of side pages, it is easy to manage the navigation or other supplemental pages in a component. These pages act as a standalone object and could be added to the component like any other standard pages. The moment these pages are added, the component starts displaying the side panel pages (left panel or right panel) and it does not require additional styling or coding. In version 8.54 the toggling between the side pages and main pages were handled with the help of certain derived functions present on the people code event PT_TWOPNL_WRK.BUTTON.FieldFormula.

The toggle switch you see on the two panel layout was an actual button field present on the page, style of which was controlled to work as the side panel pull switch. However with the side page concept of 8.55 onwards, the field button is not part of the application pages and these functions may not work as expected.

With 8.55 onward the inbuilt logic to control the appearance of the fluid components is delivered in application packages.  People Tools is delivering an application package PT_PAGE_UTILS which contains classes to control the general behavior of fluid components. In that application package there is a Application Class named PanelController which can be used to control the behavior of Side Pages in a two, three or four panel page designs.

The application class consists of methods which could be invoked to set the behavior of the side pages. The methods that consists the names Side1 can be used to control the Side Page 1 (Left Panel). Similarly the methods that consists the name Side2 can be used to control the Side Page 2 (Right Panel).

Almost all the methods are pretty much self explanatory so that reading the method name will give you a fair idea of what that method is intended to do. Some methods such as SetSide1Enabled() expects an input Boolean value to decide whether the property that need to be set is Enabled/Disabled.  There are couple of method which will control advanced properties. For example using the method UsePersistentOpenModeSide1(True) will keep the left side panel always open regardless of the size of the browser window. It will also keep the left panel open even if the user has selected an item from the left panel navigation list.

These methods will be handy when you have to code the side panel to behave differently in different devices.

For example, the below piece of code will open the side panel by default if the component is rendered on a large form factor device.

import PT_PAGE_UTILS:PanelController;

Local PT_PAGE_UTILS:PanelController &objPage;

&objPage = create PT_PAGE_UTILS:PanelController();

If %Request.BrowserDeviceFormFactor = %FormFactor_Large Then
&objPage.Initialize( False);
&objPage.SetSide1OpenState( True);
&objPage.UpdatePanel();

End-If;
Thursday 15 September 2016

Creating your own Push Notification messages in PeopleSoft

Peoplesoft is showing much technological advancement along with the fluid technology. Most of these are aimed at improving the user experience and productivity. One such great functionality that benefits the users will be the Push Notification functionality.

We are moving to a new era in Enterprise Applications where notifying the users via emails or work list entries are becoming a norm of the past. The latest trend is to show the notifications or messages directly to the user within the application itself that too at the real time; similar to the notification capability we currently have in many new generation web sites. The PeopleSoft Push Notification functionality helps us achieve the same in PeopleSoft applications.

PeopleSoft push notifications can be broadly categorized into two, the one with actionable items and the one with informational only messages. These messages also have the capability to redirect the user to any other application pages relevant to the message.

PeopleSoft applications are already delivering push notification messages along with the applications such as approvals. However there can be scenario where you need to have your own notification messages. In this post I will be explain how a new push notification message can be developed for your application. Before you start developing it is expected that you are on a tools release >= 8.54 and have push notification configured in the environment (PeopleBooks Link).

PeopleSoft Push Notification


Setting up a push notification message won’t take more that 10 lines of code. The key to the new push notification development is the application class PTPN_PUBLISH:PublishToWindow, where there are pre-defined methods to which the developer needs to pass the parameters.

The parameters that you have to pass to the application class objects would be the recipient user list or role list, message to be displayed, URL to which the link needs to point to, whether it is actionable, the action label and messages allowed etc.

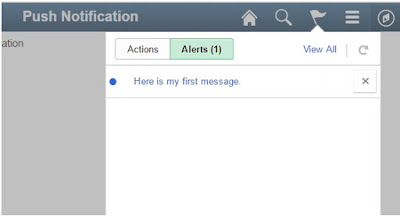
I am providing a sample piece of code which will generate a sample notification (shown in the picture below) message instantly.
PeopleSoft Push Notification Alert

The following people code is written on the FieldChange event of the push button, so that the notification is sent out whenever the user clicks the push button. You may write the code depending on your business case and pass the appropriate parameters.

As opposed to my previous posts, the steps and explanations are included in the code itself. So make sure you read through the comments provided in between the code lines to see more details on the code.


import PTPN_PUBLISH:PublishToWindow;

Local PTPN_PUBLISH:PublishToWindow &objNotification;

Rem Initialize the notification message. Pass the event and category name you might have created. For testing purpose you can use the same code given below;
&objNotification = create PTPN_PUBLISH:PublishToWindow("PUSHNOTIFICATIONWINDOW", "SENDNOTE");
Rem Provide the category name you might have created for your application. For testing purpose you could provide any sample value and test it out;
&objNotification.SetCategoryAlias("Hello World");

rem For Actionable notifications use the below method;
rem &objNotification.SetCategoryTypeActionable();

rem For alerts use this method. The current example is for alert kind of notifications;
&objNotification.SetCategoryTypeFyi();

Rem Provide any key identification value to distinguish the message, you could give the transaction key or a timestamp as example;
&objNotification.SetMsgKey(String(%Datetime));

Rem Pass the actual message that needs to be displayed to the user;
&objNotification.SetMsgInfo("Here is my first message.");

Rem Pass the message state. SetMsgStateNew can be used for new messages. For cahnes in message state, you may use the methods SetMsgStateUnread, SetMsgStateRead and SetMsgStateDismiss. To get the current message state use the method along with the user id GetMsgState();
&objNotification.SetMsgStateNew();

rem For Actionable kind of notifications use the below method where you pass the actions label and the resulting URL;
rem &objNotification.SetArrayOfActions(CreateArray("View Assignment", "View My Calendar"), CreateArray(&URL1,&URL2));

rem I am generating a URL which will bring the user back to the page where the message has originated;
&sURL = GenerateComponentPortalURL(%Portal, %Node, @("MenuName." | %Menu), %Market, @("Component." | %Component), %Page, "U");

Rem Pass the URL to which the user needs to be re-directed when they click on the message (link);
&objNotification.SetOnClickUrl(&sURL);

Rem Pass the operator ID/Role of the recipient to which the notification needs to be sent. Pass 1 for user ID and 2 for role name ;
&objNotification.AddRecepient("MARK", 1);

rem In case of multiple users or roles use the below method;
 rem &objNotification.AddRecepients(&arUserList, 1);

rem Finally use the Publish method to publish the notifications to the users;
&objNotification.Publish("");


Followers