The views expressed on this blog are my own and do not necessarily reflect the views of Oracle.

Sunday 30 October 2016

Three Simple Tips for Fluid Beginners

In this post I would like to share three “easy to implement” tips that will prove helpful in PeopleSoft Fluid applications development. I have selected the topics such a way that the development of each item discussed below could be completed within five minutes of time with proper knowledge, which otherwise would take a lot of time to be spent on css, pagelayouts, code debugging etc.

Tab Selection

The first topic I would like to explain is how you would be able to build tab selection buttons or button sets very easily in PeopleSoft fluid application similar to the one shown in the below picture.

Peoplesoft tab selection

You will be surprised to know how easy it is to create such tabs for your applications as well. The steps you have to follow will be as below.

Step 1: Create a field with translate values. Each translate value will be one of the selection option in the tabs.

Step 2: Create radio buttons for each translate value on the page you intent to show the tabs and wrap all the radio buttons within a group box of type “layout only”. Provide the style class “ps_button_bar” to the group box.

Step 3: Write peoplecode on the Field Change event. Here you could write the logic for selection of each value.

Step 4: Test the page. You are done with the tabs. J

Header Panel

The next easy to create item I would like to mention here is how a header panel can be generated on Fluid pages. The header panel in fluid design is a section on top of the page where high level information on the transaction can be mentioned. This is often used in conjunction with the left panel and is termed as the three panel layout.

Let us go through the steps to create a sample header panel for a PeopleSoft Fluid page.

Step 1: Add a group box to your main page. In the Fluid tab, set the group box type as “Custom Header Bottom”. Set the style class as “ps_apps_pageheader” and save the page.

Step 2: Put any other fields or labels you want to be the part of the header inside the group box you have created in Step 1.

Step 3: Test the page. Yes, your page header is already ready to be tested.
PeopleSoft Fluid Header Page


Setting the Page Title at Runtime

The last tip I would like to share here is how you could dynamically change your fluid applications title displayed on the fluid tool bar. By default PeopleSoft will be displaying the name of the currently displayed page as the title on the header. Once you tab across different pages within a component, the system will automatically change the title to the one defined on the component definition in application designer.

There can be cases where you would like to display some other information or live metrics as the title rather than the static text defined in the application designer. You could follow the below step to change the page title dynamically using peoplecode.

Step 1: On the page activate event, write the below people code. Replace the title with the one you would like to have – include variables, field values etc of your choice.

PTLAYOUT.PAGETITLE_GROUPBOX.Label = "This is my new Page Title";

Step 2: Test your application. Isn’t it simple?


Sunday 25 September 2016

Application class to control ­­­Side (Left) Panel in 8.55

With the release 8.55 People Tools has introduced new page types namely Side Page 1 and Side Page 2. These pages are a good replacement technique to the old method of having a complex two panel layout. With the introduction of side pages, it is easy to manage the navigation or other supplemental pages in a component. These pages act as a standalone object and could be added to the component like any other standard pages. The moment these pages are added, the component starts displaying the side panel pages (left panel or right panel) and it does not require additional styling or coding. In version 8.54 the toggling between the side pages and main pages were handled with the help of certain derived functions present on the people code event PT_TWOPNL_WRK.BUTTON.FieldFormula.

The toggle switch you see on the two panel layout was an actual button field present on the page, style of which was controlled to work as the side panel pull switch. However with the side page concept of 8.55 onwards, the field button is not part of the application pages and these functions may not work as expected.

With 8.55 onward the inbuilt logic to control the appearance of the fluid components is delivered in application packages.  People Tools is delivering an application package PT_PAGE_UTILS which contains classes to control the general behavior of fluid components. In that application package there is a Application Class named PanelController which can be used to control the behavior of Side Pages in a two, three or four panel page designs.

The application class consists of methods which could be invoked to set the behavior of the side pages. The methods that consists the names Side1 can be used to control the Side Page 1 (Left Panel). Similarly the methods that consists the name Side2 can be used to control the Side Page 2 (Right Panel).

Almost all the methods are pretty much self explanatory so that reading the method name will give you a fair idea of what that method is intended to do. Some methods such as SetSide1Enabled() expects an input Boolean value to decide whether the property that need to be set is Enabled/Disabled.  There are couple of method which will control advanced properties. For example using the method UsePersistentOpenModeSide1(True) will keep the left side panel always open regardless of the size of the browser window. It will also keep the left panel open even if the user has selected an item from the left panel navigation list.

These methods will be handy when you have to code the side panel to behave differently in different devices.

For example, the below piece of code will open the side panel by default if the component is rendered on a large form factor device.

import PT_PAGE_UTILS:PanelController;

Local PT_PAGE_UTILS:PanelController &objPage;

&objPage = create PT_PAGE_UTILS:PanelController();

If %Request.BrowserDeviceFormFactor = %FormFactor_Large Then
&objPage.Initialize( False);
&objPage.SetSide1OpenState( True);
&objPage.UpdatePanel();

End-If;

Thursday 15 September 2016

Creating your own Push Notification messages in PeopleSoft

Peoplesoft is showing much technological advancement along with the fluid technology. Most of these are aimed at improving the user experience and productivity. One such great functionality that benefits the users will be the Push Notification functionality.

We are moving to a new era in Enterprise Applications where notifying the users via emails or work list entries are becoming a norm of the past. The latest trend is to show the notifications or messages directly to the user within the application itself that too at the real time; similar to the notification capability we currently have in many new generation web sites. The PeopleSoft Push Notification functionality helps us achieve the same in PeopleSoft applications.

PeopleSoft push notifications can be broadly categorized into two, the one with actionable items and the one with informational only messages. These messages also have the capability to redirect the user to any other application pages relevant to the message.

PeopleSoft applications are already delivering push notification messages along with the applications such as approvals. However there can be scenario where you need to have your own notification messages. In this post I will be explain how a new push notification message can be developed for your application. Before you start developing it is expected that you are on a tools release >= 8.54 and have push notification configured in the environment (PeopleBooks Link).

PeopleSoft Push Notification


Setting up a push notification message won’t take more that 10 lines of code. The key to the new push notification development is the application class PTPN_PUBLISH:PublishToWindow, where there are pre-defined methods to which the developer needs to pass the parameters.

The parameters that you have to pass to the application class objects would be the recipient user list or role list, message to be displayed, URL to which the link needs to point to, whether it is actionable, the action label and messages allowed etc.

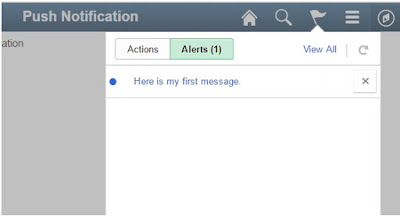
I am providing a sample piece of code which will generate a sample notification (shown in the picture below) message instantly.
PeopleSoft Push Notification Alert

The following people code is written on the FieldChange event of the push button, so that the notification is sent out whenever the user clicks the push button. You may write the code depending on your business case and pass the appropriate parameters.

As opposed to my previous posts, the steps and explanations are included in the code itself. So make sure you read through the comments provided in between the code lines to see more details on the code.


import PTPN_PUBLISH:PublishToWindow;

Local PTPN_PUBLISH:PublishToWindow &objNotification;

Rem Initialize the notification message. Pass the event and category name you might have created. For testing purpose you can use the same code given below;
&objNotification = create PTPN_PUBLISH:PublishToWindow("PUSHNOTIFICATIONWINDOW", "SENDNOTE");
Rem Provide the category name you might have created for your application. For testing purpose you could provide any sample value and test it out;
&objNotification.SetCategoryAlias("Hello World");

rem For Actionable notifications use the below method;
rem &objNotification.SetCategoryTypeActionable();

rem For alerts use this method. The current example is for alert kind of notifications;
&objNotification.SetCategoryTypeFyi();

Rem Provide any key identification value to distinguish the message, you could give the transaction key or a timestamp as example;
&objNotification.SetMsgKey(String(%Datetime));

Rem Pass the actual message that needs to be displayed to the user;
&objNotification.SetMsgInfo("Here is my first message.");

Rem Pass the message state. SetMsgStateNew can be used for new messages. For cahnes in message state, you may use the methods SetMsgStateUnread, SetMsgStateRead and SetMsgStateDismiss. To get the current message state use the method along with the user id GetMsgState();
&objNotification.SetMsgStateNew();

rem For Actionable kind of notifications use the below method where you pass the actions label and the resulting URL;
rem &objNotification.SetArrayOfActions(CreateArray("View Assignment", "View My Calendar"), CreateArray(&URL1,&URL2));

rem I am generating a URL which will bring the user back to the page where the message has originated;
&sURL = GenerateComponentPortalURL(%Portal, %Node, @("MenuName." | %Menu), %Market, @("Component." | %Component), %Page, "U");

Rem Pass the URL to which the user needs to be re-directed when they click on the message (link);
&objNotification.SetOnClickUrl(&sURL);

Rem Pass the operator ID/Role of the recipient to which the notification needs to be sent. Pass 1 for user ID and 2 for role name ;
&objNotification.AddRecepient("MARK", 1);

rem In case of multiple users or roles use the below method;
 rem &objNotification.AddRecepients(&arUserList, 1);

rem Finally use the Publish method to publish the notifications to the users;
&objNotification.Publish("");


Monday 1 August 2016

Adding your own custom logic without customizing the delivered people code

Yes you have read it right. With the release of People Tools 8.55, you could customize (append would be more appropriate term) the delivered application without having to touch (or customize) the Oracle delivered people code.

Customizing the delivered code was always a pain point when the application maintenance team is considering an upgrade or applying any patch provided by Oracle. The maintenance team always have to look at the code conflicts, apply patches/upgrade, re-customize the application, re-do the custom and delivered test cases and so on. Just a single line of custom code in the delivered application may force you to take through all these steps.

With People Tools 8.55, The Related Content Configuration setting is expanded to add a new tab labeled “Event Mapping” where in you could actually map your custom written people code to a delivered people code event. All this is done through PIA and the major point to highlight here is that this is not considered as a customization and the delivered code will execute as it is in addition to your custom code. This directly means you can now apply patches and upgrades with much simpler process.

Although it now allows you to map your people code before/after the execution of a delivered people code event, this won’t allow you to change/modify the actual delivered code. If you really have to do that, then you can append your people code which first reverses the delivered logic and then implements your logic. Another limitation to note here is that right now only select few events are available for extension. Having stated that, with the current capabilities alone, you will be able to remove customization of a major part of your customizations.

Let me move on to the technical implementation of the Event mapping. As the name suggests you will be mapping your people code to a delivered event. And how that is done is via a Related Content Definition of type Application Class. The step by step process of how this can be done is listed as below.

Step 1: Create an application class which implements the delivered app class PT_RCF:ServiceInterface

Step 2: Create a method name execute() and write your custom logic inside that method.

import PT_RCF:*;
class Hello_World extends PT_RCF:ServiceInterface
   method execute();
end-class;

 method execute
   /+ Extends/implements PT_RCF:ServiceInterface.execute +/
WinMessage(“Hello World”,0);
end-method;


Step 3: Create a Related Content Definition with Type Application Class and select the application class you have created now.

Main Menu > People Tools > Portal > Related Content Service > Define Related Content Service

Related Content Definition


Step 4: Go to Manage Related Content Service page and select the last Tab “Event Mapping”

Main Menu > People Tools > Portal > Related Content Service > Manage Related Content Service

Select the component to which your code need to be mapped by clicking on the hyperlink “Map the event of the Application pages” and select your component from the Tree Structure.

Step 5: Now you will see two grids on the Event Mapping page. The top grid will corresponds to Component Level people code events and the bottom grid corresponds to Component Record Level people code events.

For this example let me configure/add custom code to the Post Build event of the component. So I select the event “PostBuild” on the top grid and select the service ”HELLO” created in the previous steps. Now we have two options for the processing sequence which determines whether your code needs to be executed prior to the delivered code or after the delivered code.  I am selecting “Post Process” which means my custom code will be executed after the delivered people code on that event.

Related Events Mapping


Step 6: Test your application. Open the component and see your Hello World message popping up.


Customizing the delivered application code has become a less effort task now. This new feature allows you to add your own organization specific code while enjoying the benefits of the fixes and enhancements derived by the Oracle. This is completely a non-destructive approach and I believe this will add a lot of value to your organization as well. 

Wednesday 20 April 2016

Creating a simple Two Panel Layout in Fluid

Two panel layout is one of the simplest and most needed layout in Fluid applications, especially in application where it requires more than one page to display the data. In two panel layout there are two parts to the page, a left panel which displays the master list or summary or title for a transaction and a right panel where the actual data is displayed. The left panel will be a collapsible one so that we get more space to display the detailed data on smaller form factors. Whenever you need to get details on other items on the master list, you can pull up the left panel and make the selection. Although this is the common practice, you could very well design your application to show other details or statistics on the left panel.

Let us see how we can build a two panel layout. Also please make a note that depending on the tools version 8.55 or 8.54 you have different methods to create a two panel layout. 8.55 version has the most simplistic and better solution for two panel layout. I will be getting into the details of how this can be created in 8.55 and may be try to provide some tips about getting this done in 8.54.

The steps to create a sample two panel application with navigation items on left and details on the right is as follows.

Step 1: Create a new page (of course of Fluid Type). Select the Default layout and name it as SIDE1.

Create new PeopleSoft Fluid page


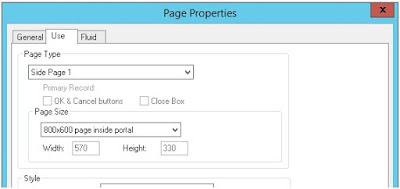
Step 2: Go to the page properties, USE tab and select page Type as Side Page 1.

PeopleSoft Side Page


Step 3: Now create three more Fluid pages with name PAGE1, PAGE2 & PAGE3 with default layout option and save these.

Step 4: If you do not already have a record to show the links and push buttons, create one as you do for classic development. Here for example I have created a dummy record with two fields.


Step 5: Now open the SIDE1 page and create a grid with these two fields (one being push button and the other one display only).

PeopleSoft Grid


Step 6: Select the Push button properties, go to USE tab and check the property “Execute PC on Row/Group Click”. On the Fluid tab provide the default style name as “psc_invisible”.
PeopleSoft Fluid Tab


Step 7: Go to the Grid properties. On the General tab, select “Unlimited occurs count”. On the Label tab, uncheck all the check boxes. On the Use tab select “No Auto Select”, “No Auto Update”, “No Row Insert” & “No Row Delete” properties. Select the grid layout as “Original Flex Grid”.

PeopleSoft Grid Properties


Step 8: On the pages PAGE1, PAGE2 & PAGE3 put a static label “Page 1”, “Page 2” “Page 3” respectively to distinguish the pages. Later you can replace it with the actual application content.

Step 9: Create a component to include all these pages with INSTALLATION as search record. On the Internet tab uncheck “Display Folder tab”. Make sure “Fluid Mode” is checked in the Fluid tab of component property.


Step 10: On component Post Build event write a PeopleCode something like as provided below. You must be replacing it with your record and field names.

The idea here is to generate the list of links.

Local Rowset &rsLeft = GetLevel0()(1).GetRowset(Scroll.TWO_PNL_DVW);
&rsLeft(1).TWO_PNL_DVW.DESCR.Value = "Go to Page1";
 &rsLeft.InsertRow(1);
&rsLeft(2).TWO_PNL_DVW.DESCR.Value = "Go to Page2";
&rsLeft.InsertRow(2);
&rsLeft(3).TWO_PNL_DVW.DESCR.Value = "Go to Page3";

Step 11: Write the application logic peoplecode you want to execute when the user clicks on the select button. Example code is provided below.


Evaluate CurrentRowNumber()
When 1
   TransferPage(Page.PAGE1);
   Break;
When 2
   TransferPage(Page.PAGE2);
   Break
When 3
   TransferPage(Page.PAGE3);
   Break;
End-Evaluate;

Step 12: Register your component and give necessary permissions.

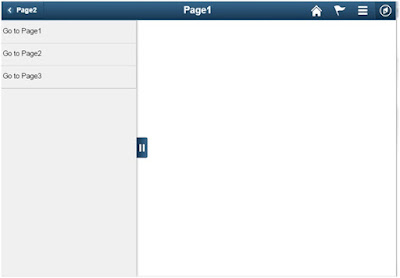
Step 13: Test out your Two Panel layout sample application

PeopleSoft Two Panel Layout


If you are Tools 8.54 release, you have to create a page with layout PSL_TWOPANEL and create subpages for the side panel and detail panel and then place it under the correct group boxes. Also you may need to ensure that you are placing the sub pages on the correct level as well.

Friday 18 March 2016

Welcome to PeopleSoft Fluid Application Development

It has been long time since I have written on PeopleSoft technical topic.  I have thought of starting of with Fluid Application development this time. PeopleSoft Fluid or New generation User Interface (NUI) is a facelift to the PeopleSoft application development. With PeopleSoft Fluid, the UI looks modern and at the same time the UI adapts to itself on various form factors.

If you are on a People Tools release 8.54 or higher, you could start developing PeopleSoft Fluid applications. The Fluid development is based on HTML5 & CSS3 technologies. So apart from People Tools development knowledge, the developer is expected to have bare minimum knowledge on HTM5, CSS3 and occasionally JavaScript.

In this post let us start with creating a very simple fluid application.

Step 1: Be Ready with your records & fields needed for the application.

Step 2: Create New Page. You have to select the new option “Page (Fluid)” for fluid development.

PeopleSoft Fluid Page


Step 3: You will see a bunch of options to select from. Select PSL_APPS_CONTENT to start with a very basic page. These options you see here are pre-defined page structures or templates. Give a name to the page and save it.

Step 4: Now we drag and drop the two field we intended to have on the application to the page. Unlike the classic development, the position of the fields on the page on app designer doesn’t matter much. So you can pretty much put the fields anywhere on the scroll level based on the required tab order. Once you are done with the page, save it.

PeopleSoft Fluid Page


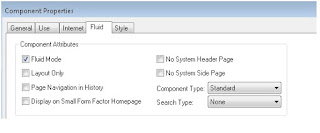
Step 5: Create a component and insert the page into the component. Now the important step is to go to Fluid tab on the component properties and select the Fluid Mode check box.

PeopleSoft Fluid Component


Step 6: Now register the component after adding it to a menu and give necessary permissions.

Step 7: Now it is time to test our fluid page. As you can see your fields are automatically arranged in PIA although you have not put the fields in order in the App Designer.

PeopleSoft Fluid Component


Step 8: Our sample application is now displaying one field per line (single column layout). Let us modify it and make it to two column layout. For that open the page field properties of both the fields, go to Fluid tab and provide the value “psc_columnitem-1of2”  for the field “Default Style Name” and save the page.

PeopleSoft Fluid Component


Step 9: Now you reload the PIA page and observe that the fields are now listed in a two column style. If you resize the browser to small size, you can observe that the fields re-align automatically to single column style to adjust to the form factor.

PeopleSoft Fluid Component


Yes, we have now developed a very basic fluid application to start with.


Followers